Sunday, June 30, 2013

Featured at Un Peu Fleur Bleue

Hi Friends
Hope you are all doing well on this last day in June.


Just a quick short post today to announce my featured interview (translated into French) as guest of the month at Un Peu Fleur Bleue

See you!


and I was also chosen to be a GD again at the 7 Dots Studio Blog along some very talented DT's and GD's

******************************
Stay tuned tomorrow for my reveal at Scrap Around the world.


Have a wonderful day!!
See you tomorrow!!


Thursday, June 27, 2013

Explore- Shimmerz and Scrap Friends Challenges


This layout was inspired by this amazing sketch designed by the talented Lydell Quin for Shimmerz.
I just love the circles going up the page and I just had to mask them with light molding paste and color them in Green Shimmerz. I sprayed both bamboo leaf and olive branch to the page and let it drip into the middle. I also  dripped some Before Dawn Shimmerz spray to add contrast. 

Photo: .......Do you want to join in a Challenge using our all time favourite Paints? Come join in the fun over at the Shimmerz Blog....shimmerzpaints(dot)blogspot(dot)com. All you have to do is create a project using this months sketch and any Shimmerz Paints you can get your hands on....Remember the deal we have going ATM.....place an order, mention a Shimmerz Designer in "notes to merchant" and you will receive a free sample tub of our new Textures and Dazzlerz! Title your project SPC03, load it to our Shimmerz FB page and you are in the running! to be a Guest Designer on the Shimmerz Blog for a month, so share your work with the world! Easy as that!!!! Get started now!

If you get the chance, get yourself some Shimmerz sprays, they are really awesome!! and as I said before, if you make an order from the Shimmerz website and you mention my name at the "instructions to merchant" box during checkout, you will receive a free sample product from Shimmerz.


I also used the Yummy Scrap Palette from Scrap Friends for this layout. It was a monochromatic palette which fit my style perfectly and I couldn't pass it up.


All the yummy flowers are from Prima and I tried to match them to the palette. I also stamped with some black archival ink using BoBunny Stamps.


Finally I journaled along the edge of the paper. I really love to watch my daughter explore nature. She loves animals so much and it gives me such joy to see her discovering new things.


Materials used:
Papers: Magenta, 7 Dots Studio
Flowers: Prima
Shimmerz Sprays: Bamboo Leaf, Olive Branch and Before Dawn
BoBunny Stamps
Gesso, Cheesecloth
Black paint
Ranger black archival ink
Golden Light molding paste
Crafters Workshop circle stencil
Alphas: Stickos
Gems: Prima

Tuesday, June 25, 2013

Altered Necklace- Prima DT- Finnabair Mechanicals


Today is my first Prima reveal. 

Its a CHA Summer 2013 Sneak Peek
Sneak Peeks-01

I wanted to thank everyone who congratulated me and left me some love on my blog, Facebook and personal emails.
You guys rock my world and I'm extremely grateful to you all.

****************************
Now onto my project:

Finnabair has released an amazing new collection: Vintage Vanity and Elementals and I've created a necklace using some of the mechanical elements from  this  collection.


As soon as I saw these metal treasures from the Vintage Vanity and Elementals collection I knew I had to make a necklace out of them. I fell in love with the Mechanicals fob watch case and I knew I wanted to fill it in with treasures. I used to design necklaces so I had a copper colored chain in my stash that matched perfectly with the metal trinkets. 


SP Finnabair


I filled the empty case with a flower mechanical and glued a medallion inside of it. Then I filled the rest of the case with blue beads. Finally I cut a circle out of recycled plastic packaging and sealed the top.


I used different chain lengths to attach Mechanical elements and have them dangle down the necklace. I attached them at different lengths to add some height and texture to the look.


Supplies 
961084- Mechanicals Clocks
961091- Mechanicals 
961077- Mechanicals Vintage centre
961060- Mechanicals Washer
961039- Mechanicals Leaves I
961114- Mechanicals 

other materials: blue beads, copper chain, clasp, loops, plastic packaging and glue.

Thank you so much for visiting me today!!


Monday, June 24, 2013

Tag Set- Tresors de Luxe GD


This is my second project guest designing this month for Tresors de Luxe etsy shop. 


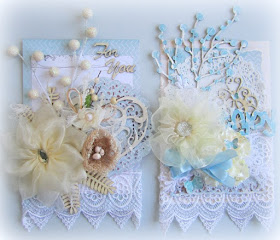
I designed a set of two tags using some of the beautiful lace and flowers from Tresors de Luxe.  Both cards were draped with the same lace at the bottom.


For this tag, I used a large cream flower and a small bouquet. I added a nest and some wooden leaves to embellish. The chipboard tattered heart is from 2 Crafty and so is the title "For You" which came from the Birthday Sentiments sheet. Both of them were painted with Claudine Hellmuth studio paint.


For my second tag, I used similar colors as the first but I decorated with a couple of Tresor de Luxe flowers and incorporated some lace as leaves.


I used three different 2 Crafty chipboard pieces. The first one is the snowball tree. which I primed with gesso and then painted the balls using blue Pearlescensse acrylic paint. 


The second chipboard piece is an ornate buckle which I painted in Claudine Hellmuth studio paint. The last pieces is the word enjoy from the Summertime word sheet.


I hope you get a chance to check out all the amazing treasures at Tresors de Luxe's etsy shop
you can also visit them on their facebook page here.


MATERIALS
Tag 1
Flowers and Lace: Tresors de Luxe
Chipboard heart and title: 2 Crafty
twigs: Creative bags
Wooden leaves and nest: Prima
Gesso, Cheesecloth
Papers: Les Papiers de Pandore, Prima
Cherry Lynn doily die cut
Claudine Helmuth Studio paint: Traditional Tan

Tag 2
Flower and Lace: Tresors de Luxe
Chipboard tree, title and decor: 2 Crafty
Gesso, Cheesecloth, doily
Pearlescensse Acrylic paint: blue and pearl white
Papers: Les Papiers de Pandore, Prima

Friday, June 21, 2013

The Road Not Taken- Sketchbook 365 DT Reveal


Here is my reveal for my July Sketchbook 365 sketch challenge. 


This month we are being sponsored by Basic Grey and we each got a chance to play with one of their newest collections. I chose the Hipster collection which is a predominantly boy collection.
I decided though not to use the Retro images from the papers but use plain and patterned papers to create this layout.


To work with the sketch, I layered different pieces of papers from the BG collection. The beauty of all BG papers is that one side is patterned while the other is usually plain. This makes these papers very versatile and therefore they can be used in many different ways.


To create the background, I masked a Prima brick template with Light molding paste. Then I painted it with green Shimmerz Paint. I also stamped some images with butterscotch and brown archival ink.


I used lots of Prima flowers to embellish the layout along with a nest and two 2 Crafty Chipboard pieces: a compass and a picket fence ATC


Materials
Papers: Basic Grey Hipster 
Nest: Recollections
Resin flowers: The trinket track
Prima brick mask
gesso, cheesecloth
Chipboard: 2 Crafty
Prima chevron stamp
BoBunny Stamp
Shimmerz green paint


Hope you can join us this month with this amazing sketch

Have a great day!!

Thursday, June 20, 2013

Beach Fun- 2 Crafty Reveal Part 2


Here is my second creation for this month's 2 Crafty Reveal.

This was a really fun layout to create. It's a bit different from my usual, as its more of a scenery set. As a focal point, is a picture of my son chasing the seagulls at the beach.
I framed the picture in the Juliet's Frame. I primed it with gesso, added some light molding paste randomly around the frame and then painted it with orange Shimmerz paint.


For the title, I used two words out of the Summertime 6x6 chipboard sheet. I simply primed them in gesso and then inked them with Turquoise Ingvild Bolme fluid chalk ink.


One of the main features of this layout is these fantastic Palm trees. After priming them with gesso I also randomly smeared them in light molding paste. Then I painted them with green and brown Shimmerz paints.


Finally after adding my flower clusters, I decorated them with two different types of 2 Crafty leaves. I used both the winter leaves and the simple leaves. I used the same techniques on the leaves as I used on the top of the palm trees.


Materials
White Cardstock
Flowers: Prima
Chipboard: 2 Crafty
Crafters Workshop template
Golden Light Molding Paste
Golden Gesso
Cheesecloth
Shimmerz paints
Prima resin birds
Shells

Thank you so much for visiting my blog today!!
Remember to visit 2 Crafty's Facebook page
Have a great day!!

Wednesday, June 19, 2013

PRIMA DESIGN TEAM 2013-2014-------A DREAM COME TRUE


Well, My Dream finally came true!!

I'm really happy to announce that I was chosen to be a Prima Designer for 2013-2014
It couldn't be a greater honor and I'm so delighted to be a part of this group of talented designers. 


I've been a Prima fan for quite a few years, so I was thrilled when I was invited this year to design for them.

I've applied to their DT for the past 3 years and I finally made it. It just shows that you should never give up on your dreams, whatever that dream may be.

It was my dream to design for this amazing company and even though I didn't make it for the past few years, I continued to persevere because I really wanted my dream to become reality.

I'm so very grateful for this opportunity and I'm so thankful to G-d because I feel he's always watching over me and my family. 

 I want to thank my family for always believing in me and supporting me, especially in the past few months. You are my everything.

 I also want to thank all my scrappy and non-scrappy friends. You know who you are and I thank you for always being by my side in my highs and lows. 

To all of you above I just want to say thank you. I couldn't have done it without all your love and support and for that I'm so very grateful.
I love you and I bless you all with health and happiness.

Now come check out the Prima blog and get inspired by this brand new group of designers.


I hope you have a wonderful day!!

xoxo


Tuesday, June 18, 2013

You are my Sonshine- 2 Crafty Reveal Part 1.


Its that time again for my reveal at the 2 Crafty Blog. This time I'm Summer Lovin' as I've been waiting for sunshine for a long time.  Its been raining a lot so I just dream about summer through my pages.


I recently found this picture of my son when he was 4 years old at the pool and I thought it was perfect for a summer LO. He's grown so much since then. He's now 12 years old but I still remember that cute, pudgy face as if it was yesterday.


I framed the picture in an ornate frame from 2 Crafty. I primed it with gesso and then I randomly spread some light molding paste. Finally I painted it in Pearlessense blue acrylic paint.


I had the idea to add a banner on the layout, however I couldn't find a good place to add the banner so instead, I used the triangular shape of the banner and made a sun around my picture. I used these Plain Triangles to create the sun. First I primed them with gesso. Then I painted them with Yellow Pearlessence acrylic paint.


Finally after decorating with lots of flowers, I added these two Floral Sprays to the flower cluster to add some flow to the LO.


Materials:
White Cardstock.
Chipboard: 2 Crafty
Flowers: Prima, dollar store
Pearlessense Acrylic paint: Blue, Yellow
Rain drops mask: Prima
Shimmerz:  Jenny b Blue
Golden gesso
Golden light molding paste
cheese cloth
Orange pen
Alpha: Prima and Websters Pages

Thank you so much for coming here to visit me!!
2 Crafty also has a Facebook Page. I hope you come by to visit!!
Have a great day!!!


Sunday, June 16, 2013

Live out loud- 7 Dodts Guest Designer

As a final layout for my GD at 7 Dots Studio, I decided to make a layout about myself and what better collection to use than the Queen's Heart


This photo of myself was taken between some fallen trees at a park nearby.


I used lots of fussy cut layers from The Queen's Heart collection which I sprayed with some Shimmerz bed of roses.

I used two different 2 Crafty chipboards for this layout. The first one is the title Live Out Loud which I simply covered in gesso. The second one, is a small postage stamp frame which I covered in Sandy Stone Texturez from Shimmerz.
I just love the texture on these new Shimmerz products so much. I used them so often on my layouts. As I said before, if you do order from them, and you mention my name at the "instructions to merchant" at checkout, and you'll receive a sample sized Texturez or Dazzlerz with your order.


7 Dots Studio Papers:
All I ever- Velveteen Dreams
The Queen's Heart- I wanna be...
The Queen's Heart- Just remember
The Qheen's Heart- Tags

Other materials:
Flowers: Prima
Chipboard 2 Crafty
Canvas resist butterflies: Prima
Resin flowers: Recollections
Gems: Prima
Shimmerz Sandy stone Texturez
Shimmerz: After Dawn, Bed of Roses
Prima mask
Light Molding paste and Gesso: Golden
white pen
cheese cloth

I had so much fun designing for 7 Dots this month. Thank you to Tusia the owner and her designers for making me feel so welcomed!!


Saturday, June 15, 2013

Play- 13 Arts and Art Banderoli


For my reveal at 13 Arts, I made this layout and combined it with another page for my Travel Album Project for Art Banderoli


I've been eyeing this palm stencil from Scrap Fx for quite sometime. Finally I borrowed from my friend Agnieszka Bellaidea so I can use it for my beach themed layout for this month.


I grabbed one of the papers from the newest collection from 13 Arts: Faces of Spring. This paper is called wind in my hair and those black wisps which I thought were palm trees are actually hair wisps.  However I enhanced them with the palm stencil and now they truly look like palms from a tropical scenery.


I added lots of flowers running up the layout and then sprayed the 13 Arts inks between them.


Finally I wanted to add some contrast to the layout so I added some black chevron washi tape and I made the title in black.


Faces of Spring collection
White Flowers
Green Twigs
Gesso
Olive Green Spray
Green ink
Yellow Spray
Pearl Sky blue spray

Other products
Flowers: Manorhouse Creations, Dollar Store, Petaloo
Alpha: black thickers
Queen's Co Washi TApe
cheesecloth
palm mask: Scrap Fx
Stickers: Heidi Swapp
Golden Light molding paste


Thursday, June 13, 2013

Delight- 7 Dots Studio Guest Designer


Here is another layout as a 7 Dots Studio Guest Designer for June.


This layout, depicts a picture of my daughter walking away during a walk at the lake. I wanted to create a nature scene around it to mimic the bushes surrounding the boardwalk. I wanted the layout to flow diagonally to give the illusion of depth

I used lots of beautiful matching Prima flowers and vines to create the scene. I added some wooden leaves and a nest, too. I also used the Thistle Shrub chipboard piece from 2 Crafty to add more texture to the background. I simply primed it with gesso and then painted it with gold pearlessence acrylic paint.


I just love the combination of these two 7 Dots collections: "Love is in the air" and "All I ever".  The hint of purple in the Love is in the air papers, matched the purple from the All I Ever papers perfectly; and together they just clicked!!


I really liked adding 7 Dots tags and stickers on this layout, as messages for my daughter when she grows up.


7 Dots Studio Papers
Love is in the air- Thunder of the sea
All I ever- Stickers
All I ever- Elements
All I ever- Peaceful Pace
All I ever- Box of emotions

Other Materials
Flowers, vine and nest: Prima
mini- flowers: dollar store
Wooden leaves icons: Prima
Gesso, Cheese cloth
2 Crafty Chipboard
Prima Mask
Light molding paste
title: Heidi Swapp
Gold pearlescence acrylic paint

Thank you so much for visiting me!!
I hope you have a wonderful week!!